Photographing a Property’s History Through Its Rooms
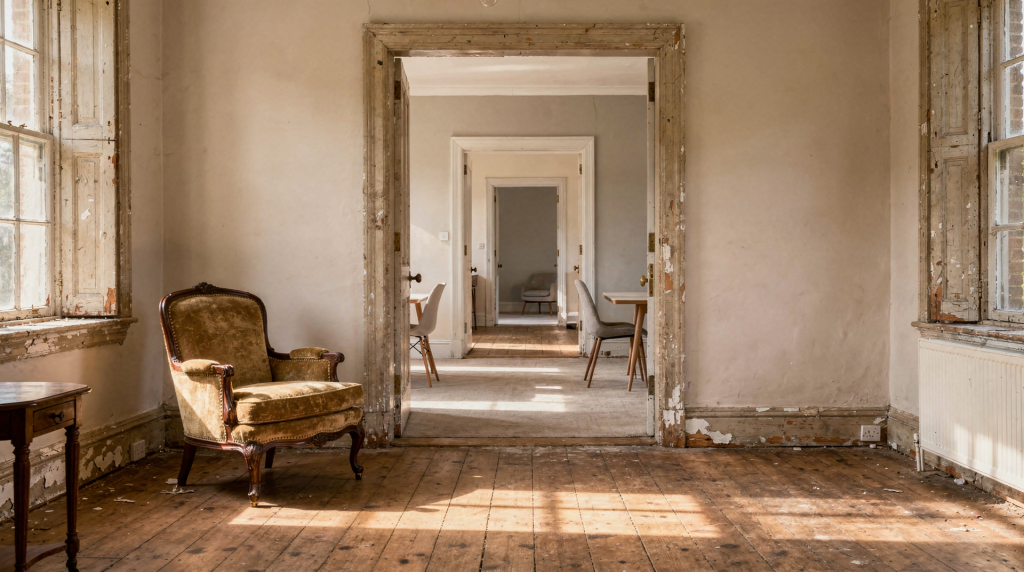
A property’s history is rarely declared from the street. It lives inside — in the worn edge of a stair tread, the patch of repaired plaster, the way morning light falls across an original window. Photographing those details well is not about making a space look beautiful. It is about showing how a building has been lived in, altered, and preserved over time.
For those of us working with film, that task carries a particular weight. Film handles texture, shadow, and imperfect light in a way that makes historic interiors feel tactile and human rather than overly polished. Digital can document a room. Film, when you get it right, can translate the feeling of standing inside it.
Why the rooms matter more than the façade
The exterior tells you when a building arrived in the street. The rooms tell you how it survived.
I learned this years ago on a commission to document a 19th-century townhouse. The front elevation was handsome but unremarkable — another preserved façade in a row of preserved façades. Inside, the house unfolded differently. Floorboards dipped where generations had walked the same path from kitchen to hallway. A filled-in doorway between two parlors hinted at a time when the rooms functioned separately. The plaster carried layers of repair, each one a small decision made by someone who chose to maintain rather than replace.
Inside a property, you can read its history through:
- floorboards polished unevenly by decades of use
- cornices that reveal original craft, later repairs, or mismatched additions
- fireplaces that show changing heating habits
- paint layers, wallpaper edges, and filled-in openings
- natural light patterns that describe the building’s orientation and original layout
A strong interior story does not try to photograph every room equally. It chooses the spaces that explain the property best. Some rooms carry the narrative. Others are just rooms. Knowing the difference is what separates a thoughtful shoot from a real estate listing.
Start by identifying the property’s visual evidence
Before loading film, walk through the building and look for evidence, not decoration. This is the step that gets skipped when schedules are tight, but it is the one that determines whether your images will have anything to say.
Focus on:
- original materials
- signs of adaptation
- traces of occupation
- surviving craftsmanship
- recurring motifs across rooms
A useful question is simple: what in this room proves the building has a past?
I keep a small notebook on these walk-throughs. Not for technical notes — those come later — but for observations I might forget once I start thinking about exposure and composition. A door hinge worn to a slant. A windowsill deepened by years of elbows resting on it. These are the details that anchor an image in time.
Practical checklist for a first walk-through
- Note which rooms still retain original features
- Identify where daylight enters and where shadows stay fixed
- Look for surfaces that show age honestly
- Find one wide view, one medium view, and several detail shots in each important room
- Record anything historically significant that you may want to caption later
This early observation stage matters because historic interiors can become visually repetitive if you only react to what looks pretty. Good property-history photography is selective. It makes choices. And you cannot make choices until you have seen what the building is actually offering you.
Build the story room by room
A historic property usually photographs best as a sequence, not as isolated images. When I edit a set of interiors, I am thinking about how the viewer moves through the space — where they pause, what they notice next, how one room prepares them for the room that follows.
A strong sequence often includes:
- an establishing view that explains the room
- a composition that shows the room’s proportions
- a detail that reveals age or craft
- a transitional image that connects one room to the next
A simple storytelling structure
- Begin with the room’s role in the house.
- Show the architecture that defines it.
- Move closer to the details that carry history.
- End with something that suggests continuity, wear, or change.
For example, a dining room may be introduced with a wide frame showing windows, ceiling height, and fireplace. Then you move to the joinery, the mantel, the skirting, or the marks around a doorway where furniture has rubbed the surface over time. On film, these transitions feel natural. The grain stays consistent across the sequence, and the slight variations in exposure between frames can actually reinforce the sense of moving through real space rather than a sanitized set.
Why film works so well for historic interiors
Film tends to reward careful observation. It gives historic rooms a sense of atmosphere that can feel less clinical than digital documentation. I have shot the same room on both formats, and the difference is not subtle — it is fundamental. Digital captures what a room looks like. Film captures what it feels like to be there.
Film is particularly useful when you want:
- softer transitions in highlights and shadows
- visible grain that supports a period feel
- a more restrained, interpretive look
- subtle color rendering in older materials
- a sense of time rather than absolute technical perfection
That said, film is not automatically better. It simply changes what you notice. Because exposures are less forgiving and each frame is limited, you are pushed to think more deliberately about composition, light, and subject. You slow down. In a historic interior, slowing down is almost always the right instinct.
There is also something about the way film renders the imperfections that define old buildings. Digital sharpening can make worn plaster look like a defect. Film grain makes it look like history.
Choosing film stock for architectural interiors
Different films shape the mood of a room in different ways. I have learned this the hard way — loading the wrong stock and watching a room’s character flatten on the light table. The choice matters as much as your composition.
| Film type | Best for | Visual character | Common limitation |
|---|---|---|---|
| Color negative | Mixed interior light, warm historic rooms | Flexible, forgiving, natural color | Can mute very subtle detail if the scan is poor |
| Black and white | Texture, form, contrast, historic mood | Strong separation of light and structure | Loses the descriptive value of color in interiors |
| Medium-speed film | Balanced daylight interiors | Good all-round choice for rooms with steady light | Less adaptable in very dim spaces |
| Fine-grain film | Detailed decorative interiors | Clean rendering of plaster, wood, and ornament | More demanding in exposure and processing |
| Faster film | Low-light heritage interiors | Helps in dim rooms with less tripod dependence | Grain can become pronounced quickly |
A practical rule
- Use color when material tone matters: wallpaper, wood stains, painted trim, tile, textiles.
- Use black and white when shape and texture matter more than color.
- Use slower films when the space is bright and calm.
- Use faster films only when the light forces the decision.
For historic interiors, the wrong film stock can flatten the room’s character. A busy grain structure may suit rough plaster or aged timber, but it can overwhelm fine decorative work. I tend to carry at least two stocks on any shoot — one for the broad, light-filled rooms and another for the corners where the light barely reaches. The moment you try to force one film to do everything, you start compromising the very textures you came to capture.
Handling natural light inside old buildings
Natural light is usually the best starting point in heritage interiors. It reveals materials honestly and keeps rooms from looking artificially staged. I rarely introduce artificial light unless the room is unreadable without it. Even then, I try to supplement rather than replace what the windows are already doing.
What to look for
- north-facing windows for softer, steadier light
- overcast days for even illumination
- early morning or late afternoon for directional texture
- side light for stone, wood grain, and wall detail
- windows that help define the room’s rhythm
Avoid letting the room become a contest between blown-out windows and underexposed interiors. Historic rooms often have deep shadows and bright openings, so exposure decisions matter. Film handles this better than you might expect — color negative stock in particular has generous latitude in the highlights — but it still demands that you commit to a choice.
Useful approach
- expose for the room first, not the window view
- let the brightest exterior highlights go if necessary
- preserve detail in the walls, furniture, and original finishes
- wait for light to move if a room changes quickly
If you are working with film, exposure latitude can help, but it does not solve poor timing. Light still needs to support the room’s structure. I have spent entire afternoons in a single room, watching how the light travels across a wall, waiting for the moment when it lands exactly where the room’s history is most legible.
Composing rooms so history reads clearly
Historic interiors photograph best when the composition feels calm and legible. The room should speak for itself. Your framing should not compete with it.
Reliable compositional choices
- shoot from corners to show depth
- keep verticals controlled so walls do not feel unstable
- place the camera at a height that preserves the room’s proportions
- use doors and arches as framing devices
- include repeated lines that guide the eye through the space
Avoid these common mistakes
- over-wide angles that distort old rooms
- compositions that crop out important architectural context
- straight-on views that flatten depth without purpose
- cluttered frames that hide the room’s historical evidence
- centered compositions that ignore asymmetry when the room needs it
Not every room wants a symmetrical image. A narrow passage, a crooked stair, or a slightly off-center fireplace may look more truthful when the composition respects the room’s real geometry. I have photographed staircases that refused to align with any grid I imposed on them. The moment I stopped fighting the asymmetry, the image started to feel like the house actually feels.
Photographing key room types in historic properties
Hallways and landings
These spaces often carry the strongest sense of movement through the house. They are not destinations — they are the connective tissue that explains how the building was used. Show:
- circulation
- stair shape
- transitions between periods
- wear patterns on railings, treads, and skirting
Living rooms and drawing rooms
These rooms usually combine domestic history with decorative detail. They are where the family presented itself, and the architecture often reflects that ambition. Look for:
- mantelpieces
- ceiling ornament
- original joinery
- evidence of use around chairs, doors, and window seats
Kitchens and back rooms
Do not overlook utilitarian spaces. They often tell the most honest story of adaptation. While parlors get preserved, kitchens get used. That use leaves marks worth photographing.
- exposed service features
- older surfaces under later updates
- working light from windows
- evidence of repair and practicality
Bedrooms
Bedrooms tend to reveal scale and intimacy rather than grandeur. They are where the house’s formal language relaxes. Note:
- proportions
- window placement
- how historic fabric meets modern use
- restraint and atmosphere
Balancing atmosphere and documentation
A property-history image should do two jobs at once: describe the room accurately, and carry the feeling of the place.
That balance is where many photographers slip. Too much documentation, and the image feels sterile — an architectural record with no pulse. Too much mood, and the room stops being informative — it becomes a photograph about the photographer, not about the building.
Ask three questions before you press the shutter
- Does this frame explain something specific about the building?
- Does the light support the room’s character?
- Would someone unfamiliar with the property understand why this space matters?
If the answer is no to all three, the frame probably belongs on the contact sheet, not in the final story. I have shot plenty of beautiful images that failed this test. They looked lovely. They said nothing. In a project about history, silence is not a virtue.
A practical workflow for a historic-interior shoot
Step-by-step
- Walk the property without shooting first.
- Identify the rooms that carry the strongest historical evidence.
- Decide which rooms need wide views and which need detail.
- Observe how natural light shifts across the space.
- Choose the film stock that matches the dominant light and material palette.
- Shoot the broad story first, then details.
- Review whether the sequence explains the property’s history, not just its appearance.
On-site shooting order
- exterior-to-interior transition
- key rooms with the best natural light
- secondary rooms that show continuity
- details and textures
- connective shots such as corridors, doors, stairs, and thresholds
This order helps you preserve narrative flow. It also reduces the risk of missing the rooms that define the property best. I have returned from shoots where I had beautiful detail shots and no establishing frame to anchor them. The sequence collapsed. Now I build the skeleton first and let the details hang from it.
Typical mistakes when photographing a property’s history
- treating every room as equally important
- ignoring how daylight changes over time
- using the wrong film stock for the room’s mood
- overcorrecting distortion until the space loses its character
- focusing only on ornate details and missing ordinary traces of use
- omitting transitional spaces that explain how the building functions
- chasing perfection and removing signs of age that make the property unique
Historic properties are not studio sets. Their value often lives in the imperfect relationship between preservation and use. The scuffed floorboard, the uneven plaster, the door that no longer closes quite right — these are not flaws to edit out. They are the story.
A simple pre-shoot checklist
- Confirm whether photography is permitted
- Check for tripod restrictions
- Identify the best time of day for each room
- Decide which rooms must be covered first
- Pack film stocks that suit the light conditions
- Bring notes for room names, functions, and historical details
- Allow time for waiting on natural light
- Leave space in the sequence for unexpected discoveries
When to include archival context
A room becomes more meaningful when its present condition is read alongside its past. I have photographed rooms that seemed unremarkable until I learned what they had been — a kitchen that was once a chapel, a bedroom that had served as a wartime hospital ward. That knowledge changes how you frame the space.
Include archival context when:
- the room’s current use differs from its original purpose
- a feature has been restored or replaced
- the property has a clearly documented period of alteration
- the visual story needs historical grounding
This can be done through captions, paired images, or a short written note accompanying the gallery. The goal is not to overload the viewer with facts, but to anchor the image in real history. A single well-placed sentence can transform a photograph from a record of appearance into a record of time.
FAQ
What makes a room historically interesting to photograph?
A room is historically interesting when it preserves original material, shows clear traces of change, or explains how the property has been used over time. The interest is in the evidence, not the decoration.
Is film or digital better for photographing historic interiors?
Film often brings more atmosphere and texture, while digital is more flexible for fast correction and technical control. The best choice depends on whether the goal is interpretation, documentation, or both. For projects where the feeling of the space matters as much as its dimensions, I reach for film.
What is the best light for historic rooms?
Soft natural light is usually the most reliable. Overcast daylight, side light, and gentle morning or late-afternoon sun often reveal materials without harsh contrast. I plan shoots around the light a room receives, not the light I wish it had.
Should every historic room be photographed the same way?
No. Some rooms need wide views to show proportion, while others are better served by details, transitions, or close material studies. The approach should follow what the room offers, not a formula.
How do you avoid making old rooms look flat?
Use directional light, preserve depth, and include features that create layers in the frame, such as doorways, fireplaces, windows, and thresholds. Flatness usually comes from flat light or compositions that ignore the room’s spatial complexity.
Conclusion
Photographing a property’s history through its rooms means looking beyond appearance and treating each space as evidence. The best images do not simply show what a room looks like today; they reveal how the building remembers its own life.
Film is especially strong in this kind of work because it handles atmosphere, texture, and restraint with a naturalness that suits historic interiors. It does not demand that a room be perfect. It accepts the wear, the shadow, the uneven light. When you combine careful observation, patient use of light, and a clear sense of narrative, the result is more than an interior photograph. It becomes a visual record of character, time, and place — a small act of preservation in silver and gelatin.