My Essential Kit for Shooting Film Outdoors
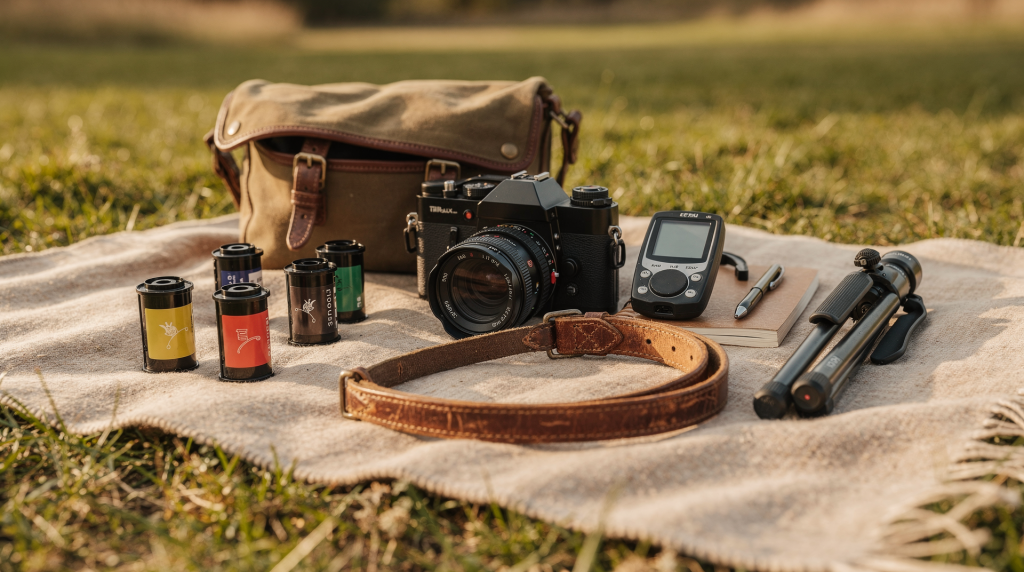
There’s a particular clarity that comes from working outdoors with a film camera. You learn to read light the way an architect reads a site: looking for how it falls, where it pools, and what it leaves in shadow. But none of that happens if you’re weighed down by gear you don’t need. The right outdoor film kit isn’t about being prepared for every scenario — it’s about staying flexible enough to respond when the light shifts in front of you, when the texture of a plaster wall suddenly catches a glancing beam, or when a weathered lintel demands a few more frames than you planned. What I’ve settled on after years of shooting 35mm and medium format on location is a lean, thoughtful selection: enough to meter precisely, protect the negatives, and keep working whether I’m documenting a 19th‑century townhouse or wandering a back lane with a single roll of Portra 400.
Why an outdoor film kit should stay lean
Outdoor work rewards simplicity. Every extra item adds weight, slows lens changes, and increases the chance of leaving something behind. A practical kit covers five essentials: exposure, protection, handling, notes, and comfort. For film photographers, that usually means carrying fewer tools than instinct suggests, but choosing each one with real‑world experience. The goal isn’t to anticipate every hypothetical. It’s to keep moving, so that when the light rakes across old floorboards just so, you’re already looking through the viewfinder, not digging through a bag.
The core camera setup
A reliable outdoor film kit starts with a camera body you trust, a lens you know intimately, and film stock matched to the conditions. I shoot architecture and quiet details, so my choices lean toward mechanical reliability and glass that renders texture honestly — the kind that shows the grain in weathered wood and the fine cracks in plaster without over‑sharpening them.
Camera body
Choose a body that is reliable, easy to meter, and comfortable to carry for several hours. For outdoor work, portability matters more than specs you may never use. If your camera is heavy, awkward to focus in bright daylight, or demands constant battery checks, you’ll hesitate — and hesitation is the enemy of the frame. I’ve learned that a body I can operate without looking down means I catch those fleeting moments when light hits a cornice or a shadow cuts across a doorway exactly right.
Lens choice
A single normal or moderate wide lens — a 35mm or 50mm on a 35mm body, or an 80mm on a 6×6 — is often enough for most outdoor sessions. It keeps the kit light and forces you to think about distance, framing, and perspective instead of swapping glass. When I’m circling a building, a fixed focal length pushes me to move: step back for the full facade, inch forward for the texture of crumbling mortar. That physical engagement with the subject leads to images that feel present, not merely composed.
Film stock
Film choice should match the weather and the subject. I’ve ruined promising afternoons by loading slow film under fast‑changing clouds. A few go‑to combinations now live in my bag by default.
| Situation | Better film choice | Why it helps |
|---|---|---|
| Bright sun, open shade | ISO 100 or 200 | Fine grain and more control in strong light — ideal for preserving delicate plaster details, sharp rooflines, and the smooth patina of sun‑baked brick without excessive grain interrupting the story. |
| Mixed light, changing clouds | ISO 400 | More flexibility when conditions shift; I reach for a stock like Portra 400 or HP5+ because it holds highlights in bright patches and still pulls detail from shadows among foliage or under deep eaves. |
| Golden hour or late day | ISO 400 or faster | Helps when the light drops quickly — especially at the end of a long shoot when you’re capturing the last warm rake across timber cladding or the blue‑hour glow on a streetscape. |
| Quiet, low‑contrast scenes | Slower film | Cleaner detail and richer tonal separation; with ISO 100 or even 50 you get a smoother transition across overcast skies and subtle stone textures that can turn muddy on faster stocks. |
The most common mistake outdoors is bringing film that is too slow for the conditions, then losing frames to motion blur or underexposure — which in film is far less forgiving than digital. I pack a roll of ISO 400 even on sunny days; it buys me an extra hour of handheld shooting when the light begins to fall.
Exposure tools that actually matter
Film outdoors can look deceptively easy because there is plenty of light. The problem is that bright light creates contrast, and contrast is where negatives get difficult. For architectural work, those deep shadows under porticoes or bright sun washing out a pale stucco wall can fool any built‑in meter. Accurate exposure is what translates a scene’s texture onto the negative — without it, you lose the character of the structure.
Handheld meter
A handheld incident meter is one of the best outdoor tools you can carry. It gives you more control than guessing from the camera’s internal reflective meter, especially when you’re dealing with backlight, deep recesses, or highly reflective surfaces like glazed tile, limestone, or weathered metal. I use it to measure the light falling on a subject rather than the light bouncing off it, which means I preserve detail in the shadow side of a facade or under a porch roof while holding delicate highlight detail in the sky.
If you skip a handheld meter, at least learn how your camera’s meter reads bright sky, shaded foregrounds, and high‑contrast architectural scenes. Bracket when in doubt; film is cheaper than losing a morning’s work to underexposed negatives.
Lens hood
A lens hood is a small item with a big payoff. It cuts stray light that reduces contrast — critical when shooting near reflective surfaces like glass or water — and doubles as physical protection for the front element. I’ve had a hood take the impact of a doorframe while I was backing up to frame a staircase; the lens glass remained untouched.
Compact reflector
For detail shots — a carved newel post, an iron work gate — a small collapsible reflector can lift shadows just enough to define texture without flattening the natural light. It’s not essential for every outing, but it earns its space when your subject sits in open shade and you want a hint more separation from the background.
Protection gear for real weather
Outdoor film photography is rarely ruined by dramatic storms. Far more often, it’s damp grass seeping into a bag left on the ground, sudden wind throwing dust onto the shutter curtain, or hours of direct sun warming up a film cartridge until it softens. The cumulative toll of small moisture and heat exposure causes more grief than a single downpour.
Weather protection basics
- A lightweight rain cover or simple waterproof shell for the camera — I use one that slips on in seconds, even if it’s just mist.
- A dry bag or zip pouch for unused film, keeping it separate from the humid air of a camera bag.
- Microfiber cloths — one for rain spots on the lens, one for dust on the body.
- Silica gel packets tucked into the bag; they quietly absorb humidity between shoots.
- A sealed plastic bag for storing exposed rolls separately, clearly marked to avoid confusion.
If the weather looks unstable, protect the camera before the sky changes. Unlike modern digital bodies, a vintage film camera’s internals are not sealed, and moisture can corrode electronics or cloud the viewfinder long after you’ve wiped the outside dry.
Sun protection
Heat is easy to ignore until batteries fail, film canisters soften, or your own concentration frays. In summer, I keep the bag out of direct sun whenever possible — a shaded doorstep or even under a jacket — and never leave film in a hot car. A roll of Portra left to bake on a dashboard will show color shifts that no amount of scanning can fully correct.
The small tools that save the day
These are the items people often skip, then end up wishing for. They’ve saved me more than once while documenting a historic building with no corner store in sight.
Essential small accessories
- Spare batteries for the camera and meter — one set in the body and a fresh pair wrapped separately.
- A film opener or a small changing bag if you reload or handle bulk film on location.
- Rocket blower or soft brush for dust; old building interiors shed decades of fine debris at the slightest touch.
- A clean lens cloth, always in a sealed pouch.
- Gaffer tape for emergency fixes — I’ve used it to secure a loose pressure plate, tag wet film containers, and even hold a flapping strap in place.
- A pocket‑sized notebook and pen for exposure notes.
- A small trash bag that can become a sit‑upon on damp stone, a quick rain cover, or a dust barrier.
A notebook may feel old‑fashioned, but it’s invaluable. When you get negatives back from the lab, the margin between remembering exactly what you metered and staring at a flat scan is a few scrawled lines: film stock, metering method, lighting conditions. That record teaches you far more than memory ever will, especially when you’re trying to understand why a certain plaster wall rendered with such luminous texture while another fell flat.
Comfort gear affects image quality
This part gets overlooked because it doesn’t live inside the camera bag. Still, comfort changes how long you can work, and how carefully you work. A tense body leads to a tense frame; you lose the patience to wait for the precise moment when light and composition align.
Pack for the person, not just the camera
- Water — dehydration clouds judgment and slows reaction time.
- Sunscreen and a hat — shooting sun‑lit facades for hours burns your neck faster than you think.
- Insect repellent if you’ll be near water or overgrown gardens; nothing ruins a steady handheld shot like a mosquito in your eyelash.
- Snacks that won’t melt or crumble everywhere.
- Layers — a morning chill can turn into midday glare, and shivering induces camera shake.
- Comfortable shoes — when I’m working on cobblestones or uneven paving, sturdy footwear keeps me upright and focused on the frame, not on my feet.
Fatigue leads to rushed frames. A sore back or a sunburned neck can end a good session early, long before the light has finished telling its story on a building’s surface.
My preferred outdoor film kit by session type
Over time I’ve honed three different load‑outs, each scaled to the kind of shoot at hand.
1. Short city walk
- Camera body — usually a trusty 35mm SLR
- One lens (a 50mm or 35mm)
- 1–2 rolls of film
- Spare battery
- Cloth
- Notebook
- Small shoulder bag — just enough for essentials, nothing left behind on a bench.
This is the lightest version and best for spontaneous shooting when you’re open to whatever architecture catches your eye.
2. All-day location shoot
- Camera body — often a medium format camera or a second 35mm body loaded with a different film stock
- One or two lenses
- Handheld meter
- 3–5 rolls of film (or more, depending on the building)
- Lens hood
- Spare batteries for both meter and camera
- Rain cover
- Cloths
- Snacks and water
This kit keeps you working if the light shifts from morning glare to afternoon overcast and back. I’ve used it to document entire historic properties, from ironwork gates to attic windows, without running back to the car.
3. Remote or landscape day
- Camera body
- Meter
- Tripod if needed — for slow film or precise architectural elevation shots
- More film than you think — remote days have a way of offering sequences you didn’t foresee
- Dry bag
- Backup batteries
- Basic first-aid supplies — a blister from walking un‑paved paths stops you as surely as a dead battery
- Sun protection
- Extra food and water
Remote shoots are where preparation matters most, because leaving the location for one forgotten item wastes the whole day — and the light you travelled hours to capture.
Common mistakes to avoid
After years of loading film in dusty courtyards and trusting weather forecasts that turned out wrong, I’ve learned to sidestep these classic traps.
Overpacking
Too many lenses and accessories create decision fatigue. You spend more time managing gear than making pictures. When I’m walking through a row of Victorian terraces, I want one lens and the space to see, not a debate about which focal length might be marginally better.
Underpacking film
Running out of film is one of the easiest ways to ruin a promising day. Bring more rolls than your estimate. A facade you thought would take three frames can reveal a dozen compelling compositions once you’re up close — the door knocker, the fanlight, the ivy tracing the brick.
Ignoring weather
Even light rain, strong wind, and humidity can create handling problems. I’ve had damp fingers fog a finder and dust stick to a freshly loaded roll. Protect the camera before conditions become uncomfortable; it’s far easier to keep gear dry than to dry it out afterward.
Forgetting notes
Without notes, you lose the learning value of the shoot. Film teaches through repetition, not guesswork. That roll of slightly underexposed frames of a limestone courthouse taught me more when I could compare my notes to the lab scans than if I’d just blamed the film stock.
Choosing the wrong film speed
ISO 100 can be beautiful in sun, but it’s not ideal for deep shade, late afternoon, or fast‑changing light. I’ve lost crisp shadows and gained motion blur because I was stubborn about using only slow film on a building shot under a canopy of trees.
A practical packing checklist
Before you leave
- Camera loaded and tested — fire a blank frame to confirm film transport
- Lens cleaned; check for haze or smudges that kill contrast on bright days
- Correct film packed, plus one backup roll of higher speed
- Spare batteries packed; fresh set in meter
- Meter working — test it against sunlight outside your door
- Memory card not needed? Good — double‑check you haven’t left one in a digital body (I’ve done that)
- Notebook and pen included
- Rain protection checked
- Water and snacks packed
- Route and return time confirmed, especially for remote locations
On location
- Check light direction first — it determines your shooting sequence, not the other way around
- Meter the scene, not just the sky; an incident reading near the building’s main plane saves highlight and shadow detail
- Keep exposed film separate from unshot rolls; I use a red zip pouch for finished rolls and a black one for fresh
- Wipe the lens before every serious sequence — gusting wind kicks up fine grit that eats contrast
- Note any exposure changes: when a cloud bank rolls through, that’s a two‑stop shift that matters
- Repack before moving to the next spot — loose film and caps get lost in transition
Choosing the right kit for your shooting style
The best outdoor film kit is not universal. A street photographer, a landscape shooter, and an architectural photographer will each carry slightly different gear. For me, the priority is preserving texture and tonality — the way siding meets shadow, the gradient on a stucco wall, the fine patina on a door handle. That informs every choice, from meter to film stock. But the underlying principle stays the same: bring what helps you see clearly, protect the camera, and keep shooting when conditions change. Start small, and add one item at a time only when you can prove it solves a real problem in the field. A bag full of “just in case” quickly becomes a bag that stays at home.
FAQ
What is the most important item for shooting film outdoors?
A reliable camera body is essential, but the most useful supporting tool is often a handheld meter — especially when light is uneven or reflecting off pale stone and glass, which can fool an internal meter into underexposure.
How many rolls of film should I bring?
For a short outing, bring at least one extra roll beyond what you expect to use. For longer sessions, pack more than your estimate — a single building can eat through five rolls once you start exploring its details and angles.
Do I need a tripod outdoors?
Not always. Use one when you plan long exposures, slow film (ISO 50 or 100 in low light), or carefully composed architectural elevations where precise alignment matters. For casual handheld shooting in good light, it’s often unnecessary and hampers spontaneity.
Is ISO 400 a good all-purpose film for outdoors?
Yes, ISO 400 is one of the most flexible outdoor options because it handles changing light better than slower stocks, giving you usable shutter speeds from full sun to open shade without sacrificing too much grain for architectural detail.
What should I do if it starts raining?
Cover the camera immediately — even a plastic bag pulled over the body is enough. Stow unused film in a dry pouch, avoid lens changes until sheltered, and wipe the camera dry as soon as conditions improve. Moisture inside a lens barrel or shutter mechanism is a slow, creeping problem that shows up weeks later as haze or intermittent sticking.
Final takeaway
An essential outdoor film kit isn’t about carrying everything. It’s about carrying the right things: a dependable camera, film matched to the light, a way to meter accurately, simple protection from weather, and a few small tools that keep the day moving. When the kit is light, organized, and grounded in real needs, you spend less time managing gear and more time making images — images of how light finds the grain in old wood, the weight of brick, and the stories built into every wall.